Introduction
In this tutorial, I'll run you through the steps of setting up Open Drone Map (ODM) on a Windows machine - specifically WebODM.
To do this, we will first setup WSL 2 and setup Ubuntu within windows. When complete, we will then set up Docker Desktop and make it run on WSL 2. Using docker we will then be able to run the WebODM docker image.
Requirements
For this tutorial, to get WSL 2 setup, you will need:
- For x64 systems: Version 1903 or higher, with Build 18362 or higher.
- For ARM64 systems: Version 2004 or higher, with Build 19041 or higher.
To find your version number, execute the following in PowerShell:
Get-ComputerInfo | select WindowsVersion
To find the build number of your Windows installation run the following in PowerShell:
[System.Environment]::OSVersion.Version
This should output something like this:
Major  Minor  Build  Revision
-----  -----  -----  --------
10     0      19041  0
Here you can see my build number is 19041 which is higher than the required 18362.
If neither of these values are high enough, try checking for updates and updating Windows. You may have to update Windows multiple times to get to the desired version and build.
Note: Windows Home and above is supported using this method.
Recommendations
I recommend installing the new Windows Terminal as it allows you to access the different terminals on your system in one place.
I recommend it as it will allow you to easily access your Ubuntu distribution with a nice terminal when it has been set up. You can find the Windows Terminal in the Microsoft Store.
Docker Setup
Setting Up WSL 2
These instructions are based on the steps in Microsoft's Windows Subsystem for Linux Installation Guide for Windows 10 documentation page at the time of writing this. If you have any issues with these steps, I recommend taking a look at the docs directly to see if a new step has been added.
- Enable the Windows Subsystem for Linux
- Open PowerShell as Administrator
- Execute:
dism.exe /online /enable-feature /featurename:Microsoft-Windows-Subsystem-Linux /all /norestart
- Enable Virtual Machine feature
- Open PowerShell as Administrator (or use the same session as step 1)
- Execute:
dism.exe /online /enable-feature /featurename:VirtualMachinePlatform /all /norestart
- Restart your machine
- Download the Linux kernel update package and run it
- Set WSL 2 as your default version
- Open PowerShell as Administrator (session as step 2)
- Execute:
wsl --set-default-version 2
Did you have any issues with these step? The original Microsoft documentation troubleshooting section might offer some help.
Installing Ubuntu
For this tutorial I will be using Ubuntu, you do not have to use Ubuntu but you will need to install an OS that supports docker.
- Go to the Microsoft Store
- Search for "Ubuntu"
- Go to the Ubuntu app that has no version by it in the title. (Any of them are fine, this is just specific for the tutorial)
- "Get" and install the app
- After it is installed, click "Launch"
- Create a new user and assign a password. (If you ever forget your password, this will help).
After creating the user, you should now be able to execute Linux-based commands. To make sure Ubuntu is running in WSL 2, execute wsl --list --verbose in PowerShell, you should see something like:
  NAME                   STATE           VERSION
* Ubuntu                 Running         2
VERSION=2 for Ubuntu means it is running in WSL 2. If it is not running in WSL 2, you may have not set the default version as shown in a previous step. To fix this, execute wsl --set-version Ubuntu 2.
Setting Up Docker Desktop
Now that WSL 2 and Ubuntu are set up, download Docker Desktop for Windows (I recommend using stable) and install it.
After installing Docker Desktop and restarting, it will start automatically in the background. You will be able to see a new icon on the taskbar that looks like this:
![]()
Right-clicking on this icon will give you a menu; go to the dashboard on this menu.
![]()
If you cannot see the taskbar icon, check the up chevron to see if it has been hidden away. If it is not their either, search for "Docker Desktop" in the start menu search, it should be there if Docker Desktop is installed.
On the dashboard that just opened, go to the settings using the cog at the top.
Under the "General" tab, make sure "Use the WSL 2 based engine" is checked (could be greyed out on Windows 10 Home).

Under the "Resources"->"WSL Integration" tab, make sure "Enable integration with my default WSL distro" is checked and that the switch by the Linux distribution installed (Ubuntu) is turned on.
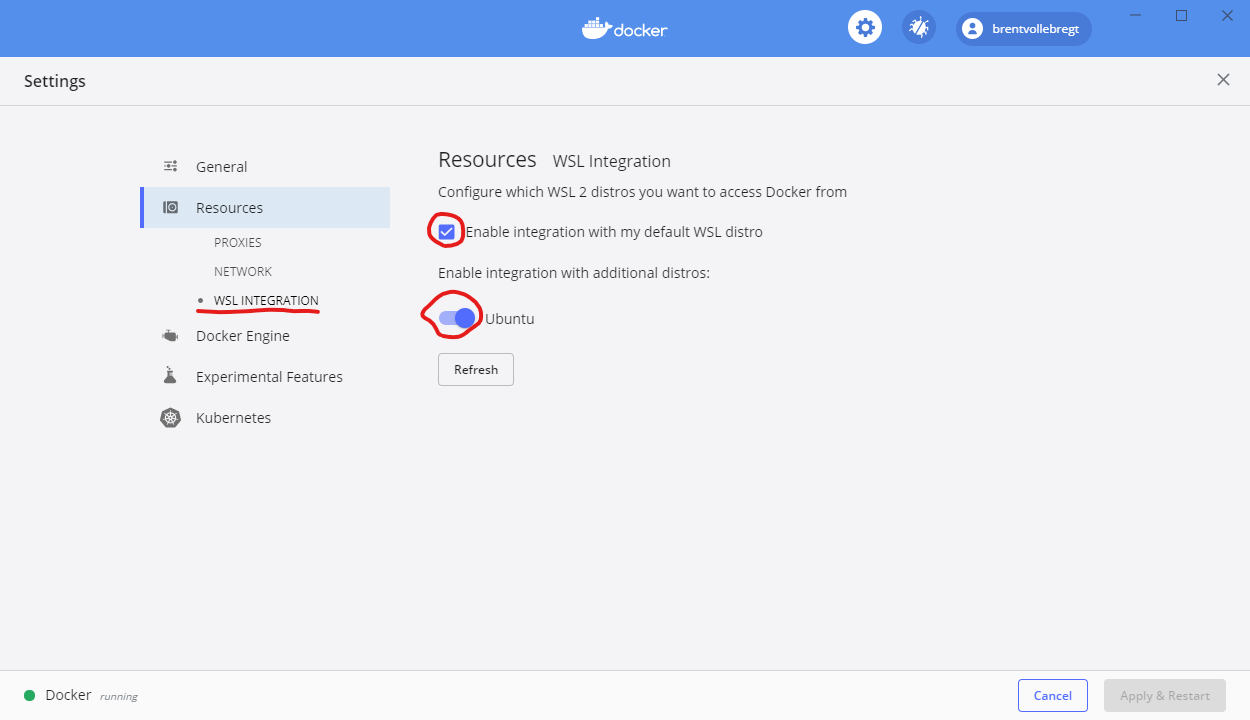
If you had to make any changes in the settings, you will need to click "Apply & Restart" in the bottom right.
Verifying the Setup
In a new terminal (you may need to start a new session), execute docker info; if you get something like the following, it has worked and you can now use docker.
Client:
 Debug Mode: false
 Plugins:
  scan: Docker Scan (Docker Inc., v0.3.4)

Server:
...
Running Open Drone Map
Now that docker is setup, we can get WebODM running.
- Open a new terminal where you want to put the WebODM project.
- Clone the WebODM repository:
git clone https://github.com/OpenDroneMap/WebODM --config core.autocrlf=input --depth 1(or download it as a zip and unzip it) - Go into the newly created directory:
cd WebODM - Start the server using
./webodm.sh start
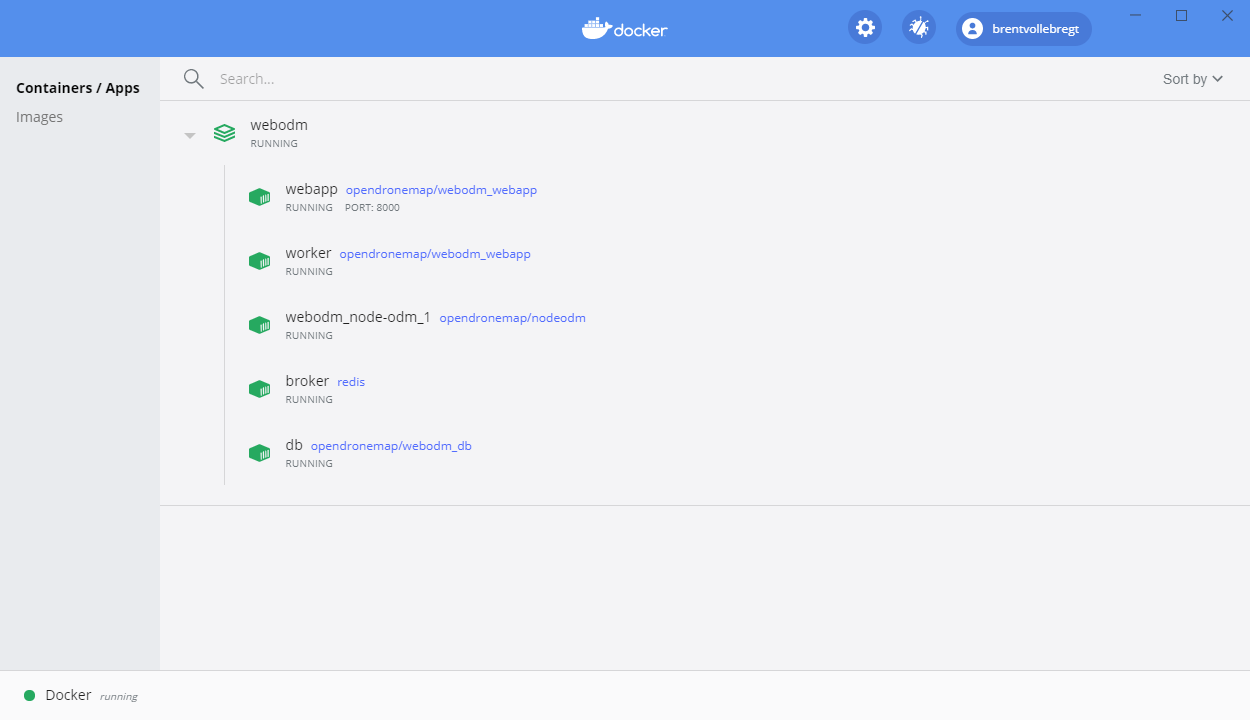
Starting WebODM may take a while as it has to set up and build all the containers. If you open up the docker desktop dashboard again, you will be able to see it's running when everything is green:
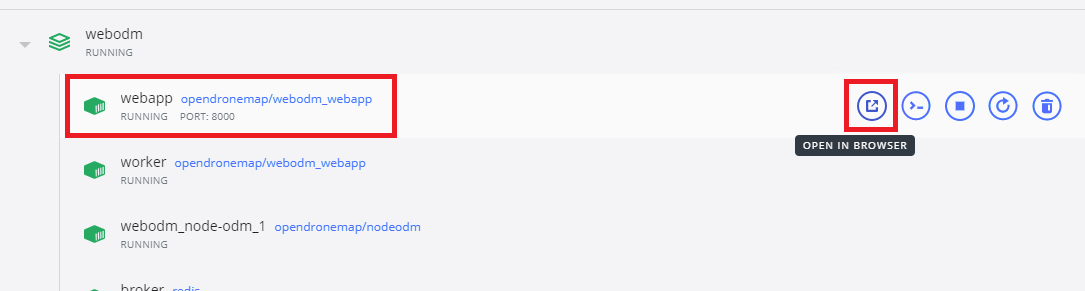
If you look at the "webapp" container and click on "Open In Browser", a browser tab/window will open at the address WebODM is hosted at.
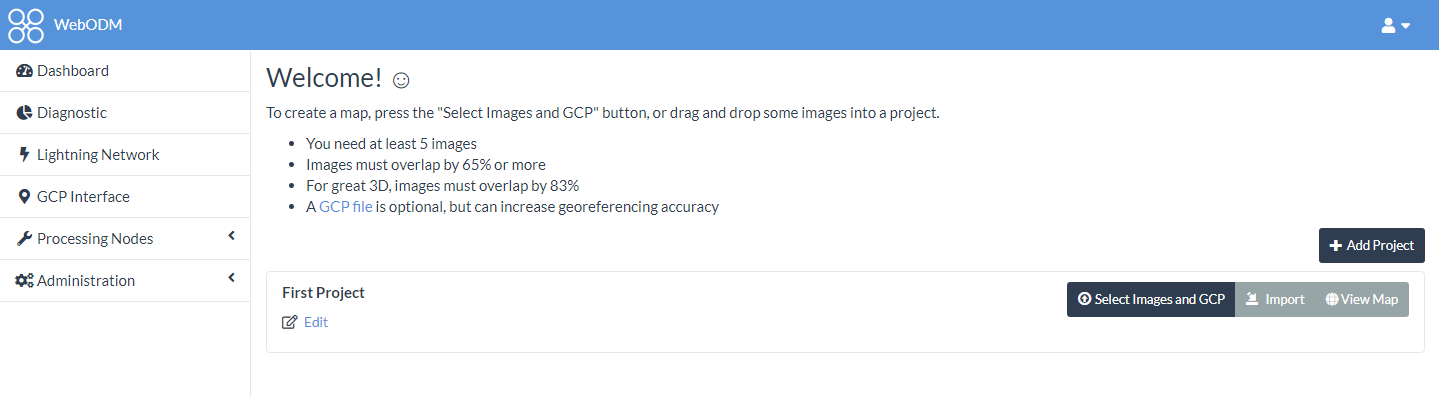
When first loading the application, it will ask you to create a username and password. If you forget your password later on, this will help - remember WebODM needs to be running and this will only change the password, you need to remember the username.
After setting up the username and password, you will now be able to use WebODM:
Stopping And Starting WebODM
Since WebODM is running in docker containers, it can easily be stopped to save on system resources.
To start WebODM, run:
./webodm.sh start
Make sure you run this in the WebODM folder that was cloned from GitHub
To stop WebODM press Ctrl + C in the terminal that opened with WebODM logs in it or run:
./webodm.sh stop