
- Introduction
- What is auto-py-to-exe?
- Installation
- The Layout of the Interface and What Things Do
- General Steps
- Debugging
- Fatal Error: failed to execute
- NameError: name 'exit' is not defined
- PermissionError: [Errno 13] Permission denied: ...
- FileNotFoundError: [Errno 2] No such file or directory
- RecursionError
- AttributeError: module 'enum' has no attribute 'IntFlag'
- ModuleNotFoundError: No module named x / ImportError: No module named x
- ERR_CONNECTION_REFUSED
- Command "python setup.py egg_info" failed with error code 1
- FileNotFoundError
- struct.error: unpack requires a buffer of 16 bytes
- RuntimeError: input(): lost sys.stdin
- When running my script with pythonw.exe, it doesn't work
- FAQ
- How do I Convert All My Python Files?
- The Terminal Just Opens and Closes But There Are No Errors
- 'python'/'pip'/'auto-py-to-exe' is not recognised as an internal or external command, operable program or batch file.
- The exe Doesn't Work on Another Computer
- Can I Create an Executable on One Operating System and Run it on Another?
- What is the __pycache__ folder?
- My Antivirus Detected the exe as a Virus
- Lots of Warnings Appear in the Output
- The Output Executable is Huge
- "VCRUNTIME140.dll" is either not designed to run on Windows or it contains an error
- LoadLibraryEx / The file cannot be accessed by the system
- The exe Runs But Does Some Unexpected Things
- Is Python Needed When Running the Output Executable?
- Additional Information and Explanations
Introduction
A while ago I wrote an article on common issues when using auto-py-to-exe. In this post, I aim to replace that post and explain more in greater depth.
Please do not feel offended if I have referred you to this page, it's just the case that many other people have asked the same question you are asking and you haven't been able to find the answers I or others have provided.
A Small Disclaimer
I cannot guarantee this post or any advice I give will fix all of your issues with auto-py-to-exe and PyInstaller. This tool allows you to select options and give data to be fed into PyInstaller, causing a lot of the errors that occur to be raised by PyInstaller; meaning I can't go and change how it works. Typically though, errors brought up by PyInstaller are due to incorrect configuration, thus this post aims to help you fix anything set up incorrectly.
If you have an issue that isn't mentioned in this post, chuck it in the comments below and I will look into adding it if we can find a solution.
What is auto-py-to-exe?
auto-py-to-exe is a project I made in my free time to make packaging Python scripts to an executable/bundle easier. The interface uses Chromes app mode and a small Python server in the backend.
When the user presses "Convert .py to .exe", all the data in the interface is sent to PyInstaller and then the output from PyInstaller is sent back to the interface. auto-py-to-exe then cleans things up in the background when done (files/folders generated by PyInstaller) and allows you to find your project in the output folder in your current working directory.
Installation
To install auto-py-to-exe, make sure you have Python 3.6 or above installed. Ideally, you will also want Chrome installed but this is not a must; it will open in your default browser if Chrome is not found and the only thing different will be the interface size.
Execute the following in the command prompt / terminal to install auto-py-to-exe:
python -m pip install auto-py-to-exe
Wait for this to finish and make sure that the last line contains "Successfully installed auto-py-to-exe" dash some version. You might get a message about your version of pip but you can ignore it.
Now to run the project, execute the following in the terminal:
auto-py-to-exe
This will open auto-py-to-exe and the output will be saved in output/ in where your current working directory is.
Possible Gevent Issue
There could be a situation when installing auto-py-to-exe that you are told you require Microsoft Visual C++ Build Tools. This occurs because the file that was downloaded from PyPI to be installed needs to be built and these tools will build it.
Generally, the way to fix this would be to install the tools and run it again, but instead, you can get a pre-built version. To do this, go to gevents PyPI page and click "Download files" on the right to bring you to the files that are on PyPI for this project. You will want to find the file that matches your setup and is a .whl file, for example, I am using Python 3.7 on Windows so I would look for cp37 in the "Python version" column, Wheel in the "File type" column and then in the files that match these two criteria, match my OS - Windows. This means the file I will want is gevent-1.3.7-cp37-cp37m-win_amd64.whl (currently gevent is at 1.3.7).
The Layout of the Interface and What Things Do
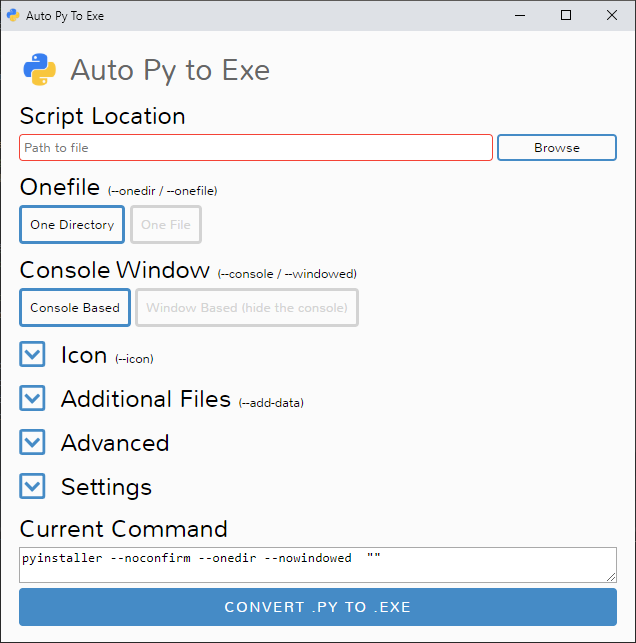
At the top of the interface, you are asked for the script location. This is the script you call to run your project, so if your project is one script, put that here, if your project is more than one script, put the script that starts it here. The inputs outline will become blue if the file exists, otherwise it will be red.
Next, you need to choose between one-file and one-directory. These are relatively similar but when using one-file with extra files like images or data files you may need to modify your script to account for path changes. The difference between these methods and people ignoring the extra step required generally result in the bulk of complaints I get.
Under that is a selection of whether you want a console window to appear or not. Simply if you are developing a GUI application or something that doesn't need the console to appear, use "Window Based". If you do want the console to appear, keep "Console Based Selected" but keep in mind that the script needs to block somewhere otherwise execution will end and the terminal will disappear immediately; a workaround for this is to put input() at the end of the script to hold execution until input is provided.
After this, you can select an icon for your executable. Make sure that the files are .ico and don't just rename a file to be a .ico - that is not how file types work.
Next, there is a section to add files to your executable that are not Python files. Since PyInstaller doesn't find extra files like images, JSON, fonts, HTML, etc, you need to add them manually. When adding an entry, the file path/folder path needs to the in the box on the left and the destination on the right; the destination is the folder in the executable.
- If you put a folder on the left, all files will be placed in the folder (and sub-directories keeping structure) specified on the right.
- If you put a file on the left, this file will be put in the folder specified with the filename the same as the original.
If you're using one-file mode, you'll be provided a link to stackoverflow which tells you how to implement a small wrapper to find the files you added. I explain why you have to do this towards the bottom of this post including an example; if you do not follow this step errors will occur.
Under this is the advanced tab which holds all PyInstallers extra flags as well as where to save the project and setting the maximum recursion depth. Here are a few flags/options that can help with things:
- --name: The name of the output folder/executable
- --hidden-import: If the executable says a module is missing, make sure you have it installed and add it here; you can separate multiple modules by a comma.
- --debug: Set this to
allto help make debugging a lot easier
The last tab is for auto-py-to-exe specific settings:
- Output Directory: The directory that the output of the application is put into.
- Increase Recursion Limit: If a RecursionError occurs, make sure this is enabled to set the depth to 5000.
- Manual Argument Input: A simple input to manually add to the current command.
The "Current Command" section tells you what would be called if you wanted to execute this in a terminal and the convert button is under this. After the conversion, you can clear the output or open the output folder where the executable/package was saved.
General Steps
The process of packaging a Python project to an executable is simple in most cases.
- Start auto-py-to-exe by executing
auto-py-to-exein the terminal - Search for your script
- Decide on whether you want the output to be a single executable or a directory (a directory has many benefits discussed later)
- Decide if you want a console window or not
- Add an icon if you desire
- Add any extra files your project requires that aren't Python files (e.g. images, csv, databases, ...)
- Click the big blue button at the bottom to package the project
- Open the location of the executable/package and run it
If you have any issues with running your script, it may be due to incorrect configuration. This means you will now have to go through a debugging process to find what is occurring.
Debugging
As basic as it sounds, the first step of debugging is to make sure your script works as a .py file before you package it. This is very important. Instead of running your .py file using IDLE (which automatically imports sys), run your script using the terminal like this: python my_script.py. Any errors that occur here will definitely show up in the output exe. If you are wanting to use the "Window Based" option, run your script using pythonw.exe - this executable can be found beside python.exe.
To debug the exe, make sure you have set up the fields in auto-py-to-exe like you had previously - all your extra files and other settings. Now go to the "Advanced" section and under the title "How to generate" put "all" in the box beside --debug. This will print out messages to the console to help you debug.
When debugging, make sure you select the "Console Based" button and "One Directory" as this will help remove basic problems; you can switch back to "One File" when there are no more bugs and then fix the ones associated with "One File" mode. When all bugs are removed, you can go back to "Window Based" if you wish.
Re-package your project and open up the command prompt / terminal and cd to the directory where the executable / package was output to. If you are using one-directory cd into that directory. Now execute ./my_project.exe (substitute the names). This will run the executable file and any errors you were missing before will be output to the console and preserved.
Look at what these errors are saying and fix them. Now repackage like you just did and keep fixing bugs and repackaging until there are no more left and your project is working properly. After this, you can then move to one-file if you were using one-directory and want one-file, and repeat the process by still staring it with cmd and debugging on.
When everything is done and there are no more bugs in the modes you want, you can enable "Window Based" if you want and remove "all" from --debug.
Not every project can be converted to one-file. This is due to files being used by the application being lost every time the application starts/stops. To understand this more go down to "Demonstration of Files References After Packaging".
Fatal Error: failed to execute
This means something has gone wrong as it's giving you a visual warning about it; this is not an error, it's a warning; the real error has been printed to stdout/stderr. If you open the executable using the terminal or something else that will preserve the console output, you will most likely see a Python error telling you what went wrong. Fixing this and repackaging is the solution to this issue.
NameError: name 'exit' is not defined
Typically when developing in IDLE, sys is automatically imported. This means calls like exit() will work in IDLE without having to import sys explicitly. However, when packaging, sys is not automatically imported so you will have to import it yourself. This is a simple fix and can be done by adding import sys to the top of your script.
PermissionError: [Errno 13] Permission denied: ...
This occurs because you are trying to modify files in a directory you do not have access to. A way to fix this is to run the script with admin privileges by opening cmd as admin and then running auto-py-to-exe once you have cd'ed to the directory you want the output to be in.
One reason this could occur is that you have opened cmd and am in System32. Make sure you do not accidentally modify files in System32. Make sure you are in a directory where you want to write files to when running auto-py-to-exe.
FileNotFoundError: [Errno 2] No such file or directory
This error is saying that a file you referenced does not exist. This can mean one of two things:
- You have not included the file (you may have not realised you needed to as it is part of a library)
- You have included the file but are not referencing it correctly
For situations where you have not included the file, you need to use the "Additional Files" section in the UI to add the required file or folder. You can identify the required file by looking at the error and then also work out the destination based on where it was being looked for.
When adding a file or folder in auto-py-to-exe, there are two boxes to fill out: the source location and the destination.
- The source location is where the file currently is on your disk. Using "Add Files" or "Add Folder" will auto-populate this field for you.
- The destination is where the file/folder will be put inside the final executable/folder. For example, if you have a file called icon.png and your code expects it to be in the folder "assets/images/" relative to your script, then you should put in "assets/images/".
For files that have been included but this error is still showing, package to one-directory instead of one-file to make sure things are working. Check out "The one-file Resource Wrapper" for a function that will help identify the root your application is currently running in.
RecursionError
This error is now prevented by the application by default by setting the recursion limit to 5000. If you want to disable this, there is an option in the Settings tab to.
AttributeError: module 'enum' has no attribute 'IntFlag'
Try executing python -m pip uninstall enum34 to stop enum conflicts. This is also a fix for the similar issue "Fatal Python error: Py_Initialize: unable to load the file system codec".
ModuleNotFoundError: No module named x / ImportError: No module named x
This means a particular module ('x' in this case) was not added to the package. I have seen this occur with packages in the pandas library and win32api; as long as you can identify the package (e.g. 'x'), then it is very easy to fix.
To fix this in the UI, open the advanced tab and find the --hidden-import input. Simply paste the module name into this input and then repackage. If the original error is still appearing, you have done this incorrectly.
For example, if you are missing pandas._libs.tslib, add 'pandas._libs.tslib' into the input by --hidden-import. Additionally, you can add more than one module, for example, pandas._libs.tslib, win32api. (See the question mark by the input for more information).
Alternatively, you may have installed auto-py-to-exe in one Python environment (a single installation or venv) and installed your dependent package in a different Python environment. Take a look at "How to Manage Multiple Python Distributions" for help on how to identify if you've done this.
ERR_CONNECTION_REFUSED
You need to be connected to the internet. This error appears when you cannot reach the servers.
Command "python setup.py egg_info" failed with error code 1
Update setuptools using pip install --upgrade setuptools.
FileNotFoundError
Make sure the file you are referencing actually exists, this error says that the file you are referencing doesn't exist. If you are using one-file mode, make sure you have followed the necessary steps.
struct.error: unpack requires a buffer of 16 bytes
This typically occurs when you have supplied --icon / -i with a file that is not a .ico file. Please note that simply changing the extension of a file to .ico does not make it a .ico file; you will need to use a converter of some sort to convert your file (e.g. png, jpg) into a .ico.
RuntimeError: input(): lost sys.stdin
This occurs when you package as a window based application and try to use print in your application. Since the application no longer has a console to print out to, it will throw this error. If you run a window based application from a terminal, it will have a console to print to - so print will work. However, if you double-click the exe from the file explorer, it will not have a console to print to.
To fix this, you can either:
- Package your script as a console based application
- Replace your print statements with something that logs to a file (or somewhere else that isn't the console)
When running my script with pythonw.exe, it doesn't work
If you are wanting to use the "Window Based" option - your script must work with pythonw.exe first (pythonw.exe and python.exe and different executables to run Python code). If you are having issues running your script with pythonw.exe, you can try these things.
1. Run the script with python.exe
This will identify any errors with the script that are not stdout related
2. Setup stdout to write to a file
Since a big part of using pythonw.exe is to remove the console, there is no stdout set up; so print() will not work by default. If you script or a library your script imports tries to use print(), it will throw an exception. You can setup stdout to point to a file by adding the following to the top of your script:
import sys
sys.stdout = open("mylog.txt", "w")
FAQ
How do I Convert All My Python Files?
Add the entry point in the script location. PyInstaller searches for imports to get the rest of the Python files required to run, so as long as you use the import keyword, your files will be added.
For example, if you have a layout like:
📂root
 ┣ 📂my_package
 ┃ ┣ 📜__init__.py
 ┃ ┣ 📜__main__.py
 ┃ ┗ 📜utils.py
 ┗ 📜start.py
Then package start.py - PyInstaller will find the rest as long as you are using the import keyword.
If you don't have something like start.py and use your application like a module (python -m [module_name]) then create a file like start.py which imports the package and runs it as you would expect. For example, this is what I do with auto-py-to-exe:
from my_package import __main__

__main__.__name__ = '__main__' # Make it look like `my_package.__main__` is the main script
__main__.run()  # Call your main function if required
The Terminal Just Opens and Closes But There Are No Errors
If you double click to run your Python script, what happens? Does it open and close also? That means this tool has done its job correctly and the script is finishing just like it should.
You most likely think the output should stay visible because you are always using IDLE or an IDE and that's what those tools do. Add a statement like input() at the end of your script to block execution and wait for you to press enter before closing.
Alternatively, there may be an error occurring which means you need to follow the debugging steps above.
'python'/'pip'/'auto-py-to-exe' is not recognised as an internal or external command, operable program or batch file.
This occurs because the path that these executables are located in is not on your path; thus cmd doesn't know where to look for them. You need to add these paths to the PATH environment variable so cmd knows where to look for the executable you are trying to execute.
I created a script that can help set up these paths automatically, which can be found in my "Fix: 'python' is not recognized as an internal or external command" post.
If you want a more manual approach to understand what is occurring, watch my video on how to setup Pythons PIP. This will show you how to add the \Scripts folder, but I also recommend you add the root Python directory (same path without '\Scripts') so the python command will work. The paths you will need to add can be found using the commands below:
import os, sys

# If 'python' is not recognised
print (os.path.dirname(sys.executable))

# If 'pip'/'auto-py-to-exe'/... is not recognised
print (os.path.dirname(sys.executable) + "\\Scripts")
If you are using something older than Windows 10, setting the PATH environment variable will be a bit different than what is demonstrated in the video. If it is just one line, add a "
;" to the end and then paste the path after the ";".
The exe Doesn't Work on Another Computer
This may be an architecture issue. PyInstaller will build an executable using the architecture of the machine it was built with. This means if you are using a 32bit machine, it will create a 64bit executable. As with any other programs, you cannot run 64bit on 32bit but you can run 32bit on 64bit. Thus I recommend using 32bit python or compiling on a 32bit machine so it will work on both architectures.
Can I Create an Executable on One Operating System and Run it on Another?
PyInstaller's documentation states:
PyInstaller is tested against Windows, MacOS X, and Linux. However, it is not a cross-compiler; to make a Windows app you run PyInstaller on Windows, and to make a Linux app you run it on Linux, etc.
PyInstaller is cross-platform, meaning the tool itself works on many operating systems, however it is not a cross-compiler, meaning the output from the tool cannot run across multiple operating systems.
There are ways to use things like "wine" on Linux to create an executable on Linux that can run on Windows, but this is out of the scope of PyInstaller.
What is the __pycache__ folder?
This is Python bytecode generated by Python. You can delete this if you wish.
My Antivirus Detected the exe as a Virus
This is your anti-virus vendors fault. Check out this. There is nothing I or PyInstaller can do to stop this. After seeing this pop up a lot more recently I stated in brentvollebregt/auto-py-to-exe#122 that you have a few options:
- Tell your antivirus that these files are fine
- Switch to a different and more accurate anti-virus
- Notify your antivirus vendor about the false positive
Typically files are quarantined during the build process which is done within a temporary directory by default.
This directory can be overridden using the --build-directory-override [FOLDER_PATH] argument.
From here, if you whitelist your custom build directory and the output directory, you could potentially stop your antivirus from quarantining the files.
If you believe auto-py-to-exe or PyInstaller is a virus, you are more than welcome to read the source code and compile it yourself. The source code for both projects are on GitHub.
Potentially helpful links:
- This comment explains why some people see builds/outputs not getting flagged when using PyInstaller 5.x.x over 6.x.x.
- This Stack Overflow answer explains that building PyInstaller from the source yourself could eliminate false positives.
- This Stack Overflow answer says bundling to one directory instead of one-file can reduce false positives (this removes the PyInstaller code to extract the one-file exe at runtime).
Lots of Warnings Appear in the Output
These warnings can be ignored in most cases. I have not currently found a situation where these are an issue, after all, they are only warnings. These warnings typically match the format WARNING: lib not found: api-ms-win-crt-<specific dll> dependency of <file>.
A YouTube user comment on the video related to this project that if you add C:\Windows\System32\downlevel to your PATH variable, these DLLS that were previously not being found can now be found. This is because the files missing are commonly found in this folder. Adding this folder to your path to now successfully locate these files can also speed up packaging times.
The Output Executable is Huge
Sometimes pyinstaller tries to be smart and will add packages it sees in your environment even if you are not using them in the project being packaged. This can lead to output executables being tens to hundreds of megabytes in size.
To get around this, the easiest way would be to:
- Create a new/clean virtual environment
- Install auto-py-to-exe into it
- Install the required modules for your project
- Use the auto-py-to-exe in this virtual environment to package your script
Doing this will mean pyinstaller doesn't see the packages you don't need bundled which can lead to smaller packages.
"VCRUNTIME140.dll" is either not designed to run on Windows or it contains an error
Try selecting the --noupx button in the advanced tab.
LoadLibraryEx / The file cannot be accessed by the system
I have seen quite a few people get tracebacks containing the following error messages:
win32ctypes.pywin32.pywintypes.error: (1920, 'LoadLibraryEx', 'The file cannot be accessed by the system'OSError: [WinError 1920] The file cannot be accessed by the system
Looking at the traceback for these situations, it is very common that I see a path like C:\Users\<USER>\AppData\Local\Packages\PythonSoftwareFoundation.Python.3.8_qbz5n2kfra8p0\LocalCache\... which tells me they're using Python from the Windows Store. As stated in pyinstaller/pyinstaller#4941, we have been told by a maintainer that:
We don't support using python from the windows store when not using a virtual environment. Please use a virtual environment; that should fix this.
So to fix this issue, download a distribution of Python from python.org or use a virtual environment. This solution is also noted in brentvollebregt/auto-py-to-exe#141.
Supporting Stack Overflow questions here, here and here.
If you install Python from python.org to fix this issue, you will need to install auto-py-to-exe in this new distribution. You will then also need to make sure you execute auto-py-to-exe from the newly installed distribution and not the old python from the windows store distribution. Executing where auto-py-to-exe can tell you where it will be execute from (the top result).
The exe Runs But Does Some Unexpected Things
A lot of people say their python script runs fine in IDLE, PyCharm, Conda or something similar but after packaging, the executable functions differently.
Examples of executables functioning differently include but are not limited to:
- A console window appearing
- Console windows appearing and closing
This difference is most likely because the script is now running in a different environment or started in a different way.
If you double-click your exe to run it, you can test how your script will run before packaging by doing the following:
- Set the default application for .py files on your machine to the python.exe binary you are using to run your .py file
- Double-click on your .py script to run it
- Witness how your application runs
If you are packaging to a single .exe file (onefile), set pythonw.exe as the default application for .py files rather than python.exe.
If your script doesn't run as expected when following this, it shows there is something wrong with the implementation of your script.
Is Python Needed When Running the Output Executable?
No, the whole point of bundling into an executable is so that your script can be run on a different computer without Python installed.
The Python interpreter is packaged in the output executable.
Additional Information and Explanations
Some things that are clear to people that use Python a lot are not always clear to new people. Here are some discussions about why and how things occur.
Using concurrent.futures
It was brought to my attention by William Lake in this GitHub issue that when using concurrent.futures for any multi-threading/processing, it is recommended to add the following import:
from multiprocessing import freeze_support
and this line to your main:
freeze_support()
William had stated that before adding these lines, he kept getting errors regarding concurrent.futures even though it worked fine before packaging.
The Difference Between One Directory and One File
One directory puts all your files in one folder. You can easily add and remove files like you normally would in a folder. When your script modifies a file in its folder, the file will still be modified when you run the script again.
One file mode is a bit different, instead of putting all the files in a folder, it puts them in something like a zip file which is contained in the end executable. When you run the executable, the files contained internally are unpacked to a new temporary directory. Due to one file unpacking on startup, it is a lot slower to start.
Also due to the files being unpacked to a new temporary directory on execution, the files that you modified added that were in the same directory as the executable will not be there on the next run because they are now in a different unknown folder. This means when creating files, you will want to use an absolute path that is not where the project files are (could use something like APPDATA on Windows).
Demonstration of Files References After Packaging
I made a small Python file that finds where it is located and then tries to print the contents of a file if it exists otherwise will create a new one.
import sys, os
if getattr(sys, 'frozen', False): # we are running in a bundle
    bundle_dir = sys._MEIPASS # This is where the files are unpacked to
else: # normal Python environment
    bundle_dir = os.path.dirname(os.path.abspath(__file__))

print ('Location : ' + bundle_dir) # Where the base file exists

file = bundle_dir + '\\test.txt'
print ('File is at: ' + os.path.abspath(file)) # Absolute path of target file
if os.path.isfile(file):
    with open(file, "r") as f:
        print ('Contents:\n' + f.read()) # Print contents of file if it exists
else:
    print ('Created a new file') # Create a file if it doesn't exist

with open(file, "a") as f:
    f.write('New Line\n') # Add a new line to see if is there next time

input() # Block to keep terminal alive
Running this un-packaged (.py)
The first time it will create a file beside the script. Every time it is run, the new line will be added and this will be shown in the output. This means When you modify a file, it will stay modified.
Running this when packaged using one directory
The first time it will create a file in the directory (which will be beside the .exe). Every time it is run, the new line will be added and this will be shown in the output. This means When you modify a file, it will stay modified.
Running this when packaged using one file
Every time this is run, it will create a new file in the temporary directory. This occurs because the .exe unpacks to a new directory every time it is run, so instead of finding old files (which can disappear any time because they are in the temp folder) you may as well use an absolute reference to somewhere else.
The one-file Resource Wrapper
As described in the section above, non-python files that are bundled into an executable when using one-file mode need care when being referenced due to how they are un-packaged.
In the interface, when one-file mode is selected and the additional files section is expanded, a note can be found that references a StackOverflow question regarding "Bundling data files with PyInstaller (--onefile)". The first answer provides a nice snippet of code:
import sys, os
def resource_path(relative_path):
    """ Get the absolute path to the resource, works for dev and for PyInstaller """
    try:
        # PyInstaller creates a temp folder and stores path in _MEIPASS
        base_path = sys._MEIPASS
    except Exception:
        base_path = os.path.abspath(".")

    return os.path.join(base_path, relative_path)
When referencing files using relative references, instead of using open('folder/my-file.jpg'), you will want to use open(resource_path('folder/my-file.jpg')). This appends the relative path you provided to the current / extracted location to make an absolute file reference which is safe to use.
The reason you need to use this extra bit of code is because a one-file exe will unpack all of it's contents to a new folder in the operating systems temporary directory. This means the current working directory initially set in the application will not be where the files have been unpacked to unlike one-directory. This is why using relative references will work in one-directory but not in one-file - you need to adjust for the fact that the root of the project is now somewhere different.